Dig the Hole
The Hole
You need to figure out where you want it to be. Things to consider are the amount of sunlight, the proximity of trees that will shed leaves into the pond, visibility from your house or from spots from which you might want to admire it, visibility from the street or from places from which you might not want to attract attention, and the routing of water and electricity lines.
You need to decide on a shape and size. The general outline you should mark on the ground somehow. (I don't have any experience with pre-formed liners, but you can see pictures of these in any of the common books about ponds. If you use one of these, my comments about liners and hole shape will not apply, obviously.) If you are going to overwinter your fish in the pond, which is the usual thing to do (except perhaps in extreme climates), then plan on digging to a depth of 3.5 to four feet in at least one area near the center of the pond. Your fish will hibernate near the bottom. Most of the pond can be considerably shallower than that. Dig out generous shelves around the edges on which to place the pots for your "marginal" underwater plants, at various depths, ideally, to accomodate pots of various heights, and plants with varying requirements.
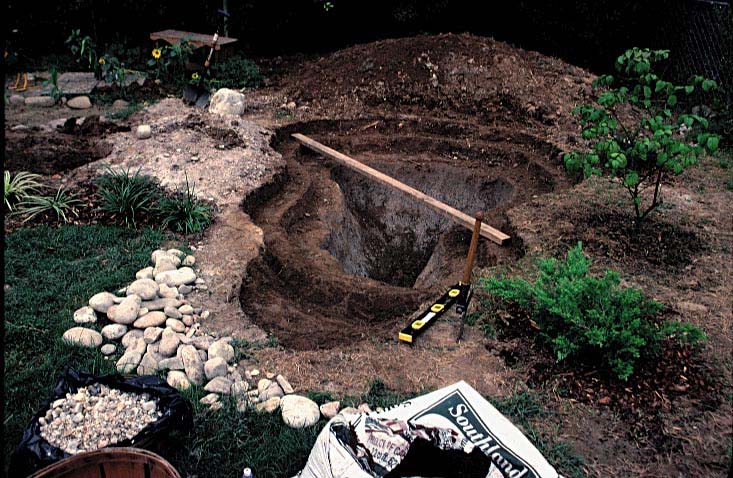 That's our pond hole, where
you can see the central, deep portion, and the plant shelves. We made the shelves too small, which makes it difficult to position planters where we would like. You can also see a long, straight board and a level nearby; using these tools, or some other device, you must ensure that the edges of your pond are at the same level, or you will be very disappointed when you fill it up.
That's our pond hole, where
you can see the central, deep portion, and the plant shelves. We made the shelves too small, which makes it difficult to position planters where we would like. You can also see a long, straight board and a level nearby; using these tools, or some other device, you must ensure that the edges of your pond are at the same level, or you will be very disappointed when you fill it up.
You might also notice an extended, shallow area near the front of the picture, next to the level. This is the "beach", which gets covered in gravel and provides a comfortable place for wildlife to enter the water. In our case, it has been utilized by ducks and turtles.
If you are lucky, you can use some motorized equipment to do the digging. Wimp. My cheerful spouse and I used simple shovels. You can see one of them, a folding army-surplus entrenching tool, right there.
The ground turned out to be filled with smooth, round rocks, such as the ones you can see piled up in front of the beach. These supplied most of the rocks we needed; we bought some additional flat stones for the waterfall at a garden center (by the pound, not cheap, but everyone should experience paying for rocks).
As you can see, we piled the dirt up behind the hole; this mound became the foundation for the waterfall and filter pool. Some people recommend against this, claiming that a mound thus formed can not easily be sufficiently compacted to provide a stable base for the waterfall, but it worked for us. Here are a few more pictures of the hole-digging process.
The Liner
If you fill up a simple hole the water will seep away. You need to line the hole with an impermeable material. There are many approaches, described in the pond books. We used a rubber liner that we bought through the mail, at half the price of local "brick-and-mortar" establishments. This is thick, black EPDM rubber, the same type used in roofing. It may be exactly the same thing, sold for more money, or something safer for fish; I don't really know. Get one piece large enough to cover the hole surface (that's larger than the surface area of the water, of course) and the entire areas of any waterfalls or filter pools, bog areas, and a generous area around the perimeter; that way you can cover everything with no seams. You will likely need help just to carry the box that the rolled-up liner comes in.
Decide what you want to do with the edges of the liner: most of the common pond books, and some web sites, have pictures of various ways of securing and hiding the edges.
Use an underlayment of something like carpet padding or fiberglass insulation to protect the liner against punctures, and lay that liner down. This part takes time and is rather hard work: it's heavy and awkward. Leave a lot of extra material around the waterfall area; you can cut it off later. Secure the edges, and fill it up. If you have not used a level to dig your hole properly, now you will suffer the consequences. Don't even think about adding fish until you have a stable, dechlorinated, aqequately oxygenated pond with a reliably running filter system.